
Overview
Converting a TXT file to XML in eFORMz allows users to structure plain text data into a meaningful XML format. This is commonly used when handling output from other applications or converting legacy data into XML for further processing.
Requirements
-
eFORMz installed and running.
-
A text file (TXT or CSV) as the source.
-
A basic understanding of the eFORMz Composer and eFORMz Preprocessors.
-
Optional: Pre-existing project that generates the TXT file.
Procedure
Load the Text File
Begin by loading the text file into your project. You can do this in several ways, including importing it directly or via a Preprocessor from another eFORMz project.
To load via Preprocessor:
-
Right-click on your project (e.g., TextToXMLBackup)
-
Choose Add Preprocessor > Project.
-
In the Project Preprocessor Properties, provide the file path to the generating project.
-
Example:
Minisoft\eFORMz_6\projects\Bradshaw\PDFTXTPreprocessor2.efz
-
-
Set the Output Format to Text

If successful, a folder named Preprocessors will appear with a bullet labeled Project.
Add "Text to XML Converter" Preprocessor
-
Right-click the project again.
-
Select Add Preprocessor > Text to XML Converter.
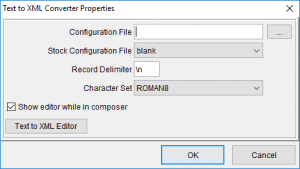
-
Fill in the following configuration fields:
-
-
Configuration File (optional): Used to pre-configure settings.
-
Stock Configuration File: Choose from:
-
RedPrairie Ship Confirmation.
-
RedPrairie Order Confirmation.
-
blank (default).
-
-
Record Delimiter: Default is linefeed
\n. -
Character Set: Based on your text encoding.
-
Show Editor while in composer: Optional checkbox to display editor.
-
Once added, the bullet Text to XML Converter appears under Preprocessors.
Launch the Text to XML Editor
-
Right-click on Text to XML Converter.
-
Select Text XML Editor.
The interface contains Lines and States columns.
Define Lines
Lines represent specific rows and positions in your text file.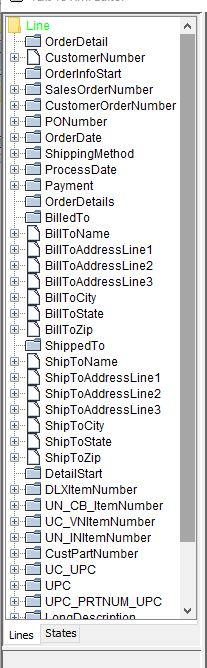
-
Right-click the yellow folder in the Lines column.
-
Choose Insert Line.
-
Select the newly created line (e.g., Line_1).
-
In the Properties section, rename it (e.g., OrderDetail).
-
Set the Code to a keyword and column position.
-
Example:
CustomerNumber:at column 3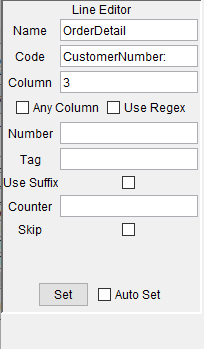
-
Enable Auto Set for automatic saving. Click Test to verify highlighting on the correct line.
Use States to Structure XML
States create the actual XML structure and variables.
-
Switch to the States tab.
-
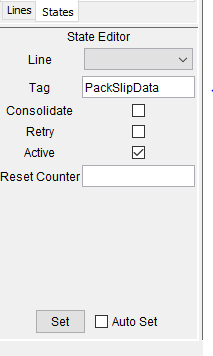
Rename the root folder (default is
null) to your desired XML root (e.g., PackSlipData).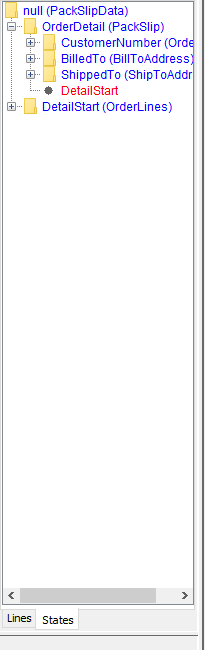
-
Click Active in the State Editor and then click Set.
Nested State
To add a nested state:
-
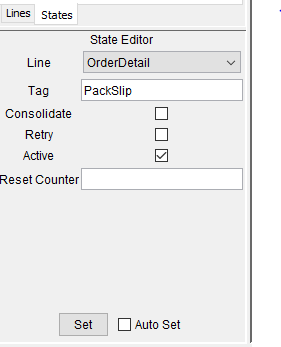
Right-click your renamed state (e.g., PackSlipData).
-
Choose Add State.
-
Select the new state and choose an associated line (e.g., OrderDetail).
-
Enter a Tag name (e.g., PackSlip) to define a folder.
-
Leave it blank if you want the variable directly under the parent folder
-
-
Click Set.
Repeat as needed for nested folders or multiple variables.
Assistance
If any further assistance is needed, please contact our Support team.
Comments
0 comments
Article is closed for comments.